Cleaning Services

Chimney Safety and Inspection Levels

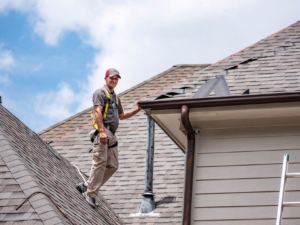
Having your chimney inspected semi-regularly will help to keep it safe and functioning properly. Cracks in the crown (the concrete, stone, or metal overhang at the top of the chimney) can allow rain to wash down the chimney, causing erosion and structural damage.

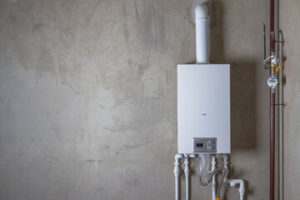
This inspection checks for obstructions like twigs and birds’ nests. It also evaluates the lining and damper. Contact Chimney Inspection Charleston SC now!

Level 1 inspections usually take about an hour or more to complete. They involve a thorough examination of the driver’s license and supporting documentation, Medical Examiner’s Certificate or Skill Performance Evaluation Certificate (if applicable), ELD or log book and hours of service records; cargo securement; vehicle cabs, engine compartments and seating; and HM/DG requirements (if necessary). Selecting a safe place for an inspection is important. The location should be paved, level and visible to traffic. It should also be free from hazards such as curves, hills and soft shoulders. Drivers are required to assist with the examination and must be near the truck or in the cab during most of the inspection.

Level 2 Inspection

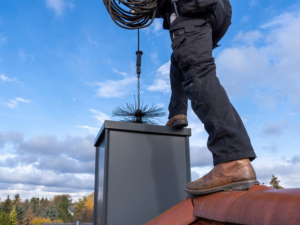
A level 2 inspection is an in-depth analysis of the entire chimney system. It includes checking the fireplace in attics and basements, looking for proper clearance from combustible building materials, and scanning the flue using a specialized video camera that allows the inspector to see even the hardest-to-reach areas of the chimney.

A detailed report is then compiled, which can include recommendations for any needed repairs and their cost estimates. The report is a critical tool in the prevention of long-term chimney problems and may help in avoiding costly and dangerous fires. Regularly scheduled maintenance and cleaning practices will also prevent many chimney-related issues that would otherwise lead to a more expensive, invasive, and time-consuming repair project.

During the Level 2 Inspection, your certified chimney sweep will take detailed notes and photos of the interior and exterior of the fireplace and chimney structure. This information will be used to write up a comprehensive report and recommend any necessary repairs that can be carried out by a licensed chimney professional.

The Level 2 inspection is recommended by your chimney sweep for a variety of reasons, including changes to the fireplace or flue system, such as switching fuel sources, adding a new insert, or making alterations to the chimney itself. These kinds of changes can affect drafting and safety, so a level two inspection is an important step in ensuring that the chimney is working correctly.

Another reason for a level two chimney inspection is if the property has recently undergone any kind of damage. A natural disaster, chimney fire, or building fire could all cause significant structural damage to the fireplace and chimney system, so a level two inspection is recommended in these situations to ensure that the chimney is safe for use.

Choosing the right General Inspection Levels affects how statistically confident you can be in your inspection results, and it will also impact the costs of testing and sample analysis. However, the AQL tables offer other special levels that can be applied to specific test types and items on your inspection checklist. These special levels allow you to reduce the number of samples required, lowering your costs and increasing the speed of the inspection process.

Level 3 Inspection

At Level 3, a vehicle is examined to ensure the vehicle meets HM/DG requirements. This is a thorough inspection that includes a level two inspection plus verification of the public and confidential VINs on, at the inspector’s discretion, any or all parts of the vehicle to determine vehicle identity and that it is equipped for highway use.

Choosing the General Inspection Level you’re comfortable with affects the statistical confidence in your inspection results and your costs. If you’re working with a new supplier or are experiencing quality issues, consider using General III until the issue is resolved.

Rust

Rust is a red or orange discolored residue that forms when ferrous metals, like those in the chimney cap and damper, mix with oxygen and moisture. Homeowners often see rust on the exterior chimney brick and mortar, chase cover and damper, and even inside their firebox. If this corrosive material isn’t promptly addressed, it will speed up masonry and metal deterioration.

Chimney rust is also a sign that your chimney hasn’t been properly cleaned. A professional chimney sweep should remove rust stains with a high-powered water sprayer and a specially formulated cleaning solution like ChimneySaver Brick and Mortar Cleaner. This non-corrosive solution doesn’t contain muriatic acid, which would accelerate damage to masonry materials.

If you notice rust in the flue liner or any other masonry component, it’s time to call for a chimney inspection and cleaning. A corroded chimney flue liner will lead to a faster buildup of creosote and increased risk of a chimney fire. It’s also a sign that your chimney isn’t effectively protecting your home from carbon monoxide poisoning.

The best way to protect against rust is to replace any rusted chimney components with stainless steel ones, which have an added protective layer of chromium that’s resistant to corrosion. This includes the chimney cap and flashing, which is a key point where water leaks into the masonry materials of your chimney. A stainless steel chimney cap and a top sealing damper like the LockTop system not only keeps birds, animals, and other critters out of your fireplace but also seals off your chimney at the top, keeping cold air out and warm air in when the chimney isn’t in use. These systems are also much easier to maintain than traditional clay flue tiles and can help extend the life of your chimney.

Spalling

Brick spalling is a serious condition where crumbling, flaking, or chipping bricks are causing deterioration to the surface of your chimney structure. When left untreated, spalling can lead to serious structural damage that compromises the safety and integrity of your chimney. Typically, spalling is the result of water intrusion, which causes the masonry to erode over time. It starts as a minor problem and can quickly turn into a big issue that requires professional repair to avoid further damage to your chimney and living spaces in your home.

Chimney Solutions professionals use a number of different methods to repair spalling bricks and ensure it does not recur. The first step is to fully assess the extent of the deterioration by carefully inspecting the bricks, mortar joints, and other areas of your chimney. The inspector will also evaluate the structural stability of your chimney to determine if it is leaning or has other signs of movement that could indicate deeper problems.

Moisture is one of the biggest causes of spalling, so the inspector will also look for any areas where moisture is leaking into your chimney. This includes the area between the chimney flue and chimney crown, which is where gaps often form after years of exposure to wet weather conditions. This area can allow water to flow down the inside of your chimney and cause other health and safety concerns like mold outbreaks in your home.

Once the inspector has a complete understanding of the extent of your spalling bricks, he or she will recommend the appropriate steps for repair. In many cases, the bricks can be repaired with a process called tuckpointing, which uses mortar that is expertly color-matched to your chimney’s unaffected areas. The repair can be a quick, affordable, and effective solution to your chimney spalling.

Plumbing

Tankless Water Heater

Rather than keeping water hot all the time, like storage tank models do, Tankless Water Heater heats the water only when you turn on a faucet. When the flow sensor detects water running, it activates a control panel to start heating with either an electric element or gas burner. To calculate the startup cost, add up purchase and installation expenses, then subtract your monthly energy savings to get the payback period.

Water Heater

Denver Tankless Water Heater can cost more to install than a traditional tank system, depending on the size of the unit, its fuel type and location. The brand can also impact costs, with some having more affordable options than others. In addition, installation fees can add up if a plumber has to reroute gas lines or upgrade the home’s electrical system.

When shopping for a new water heater, ask your potential plumbers about their installation charges. Then, compare those charges to other local plumbers’ rates. Look for a plumber who offers clear pricing information and excellent customer service. Be wary of any plumber who seems evasive when it comes to pricing questions or refuses to offer a firm price estimate before starting work.

In general, point-of-use tankless heaters have lower installation costs than whole-house models. However, the price difference can be significant if you choose a highly energy-efficient model that requires more electrical or plumbing work to install.

You should also consider the location where you live, as colder climates often require additional insulation for pipes to prevent freezing and thawing, adding to installation expenses. Moreover, installing a gas-powered tankless heater requires running a gas line to the house, so this increases labor costs compared to electric units.

A professional plumber should also be able to provide you with an accurate installation cost, including any applicable permits. This is important because the permit requirements vary from region to region. Lastly, it’s important to know that any attempts to install a tankless water heater yourself can void the manufacturer’s warranty. Therefore, it’s essential to work with a qualified plumber who can ensure that your tankless water heater is installed properly and within the manufacturer’s specifications.

It’s best to hire a licensed and insured plumber who has extensive experience with water heater installations. They should be able to assess your situation and help you select the right size unit for your needs. Then they’ll complete the necessary installation steps and ensure that everything is working as it should. For example, they’ll make sure the unit is sized properly to provide enough hot water for your household while minimizing energy consumption. In addition, they’ll test the unit after installation to ensure that it is functioning correctly.

Energy Efficiency

Many homeowners choose to install a Tankless Water Heater because of its high energy efficiency rating. These units eliminate the standby heat loss of traditional storage tanks that is common with gas units, so a lot more of your energy goes into heating water and nothing else.

The heat exchangers in a tankless unit are only activated when you run a hot water tap or use another appliance that needs it. They can be fueled by natural gas, propane or electricity and use more than 98% of the energy supplied to them to actually heat the water. They also are smaller than storage tank water heaters, which makes them a good choice for homes with limited space.

If you’re in the market for a new tankless water heater, it’s important to know that there are two types of models: non-condensing and condensing. The former are less expensive to purchase but can be pricier to install, since they require a different venting system to avoid carbon monoxide poisoning. If you already have a ventilation system that can be used, then a non-condensing tankless model may be a good option.

Both models are more efficient than storage tank units, but the most cost-effective choice for you will depend on whether your home or business has access to natural gas or if it uses electrical power instead. In addition, the type of water you have and the climate and geography where you live will influence the temperature rise needed to get hot water from your pipes.

A gas-powered tankless water heater can deliver between 5.5 and 7.5 gallons per minute (GPM), which is sufficient for most households. Electric models can produce up to 2 GPM. The flow rate required can vary based on how many appliances and fixtures you have running at the same time, but the beauty of this type of system is that it can be sized to meet your demands.

One downside of a tankless water heater is that it takes some time to heat up the water when you turn on a hot water tap or use an appliance that requires it. However, this can be offset by the fact that you’ll never run out of hot water.

Installation

The installation process of a tankless water heater involves the removal of the old unit and its connections. It also includes the replacement of a vent line for gas units and an exhaust pipe for electric units. This is a job for professionals, as it requires the use of special tools and knowledge of the plumbing code. It is important to ensure that the pipes are tightly connected to prevent leakage. Afterward, a plumber can test the system for proper operation by running hot water through each outlet. If the system is leak-free, it is ready to be used.

A thorough inspection is essential after a new tankless water heater is installed to make sure it’s functioning correctly. First, carefully inspect the electrical wiring to ensure it’s secure and not showing any signs of damage or corrosion. It’s a good idea to use a voltage tester during this step. It’s also a good idea to follow the manufacturer’s guidelines and local electrical codes when connecting the wires. Once all the connections are secure, it’s time to reattach the cover and turn on the circuit breaker.

Depending on the model of the tankless water heater, different parts may need to be replaced during the installation process. For example, some models require a larger receptacle for the power cord, while others need a specific type of terminal to connect the power supply wires. Moreover, the wiring should be of the right amperage to prevent overheating. It is also a good idea to check the electrical panel to ensure that it can accommodate the new water heater’s load.

When choosing a plumber for the installation of a tankless water heater, homeowners should look for professional credentials and exceptional customer service. For instance, homeowners should choose a plumber who offers a clear estimate and does not hesitate to answer questions about pricing. In addition, they should also find out if the plumber is licensed and insured. It is a good idea to interview several plumbers before making a decision. It is worth mentioning that some online tools can help homeowners get an accurate estimate of the installation costs of a tankless water heater. These calculators take into account a number of factors, including the size and location of the home, the type of fuel, and the brand and model of the tankless water heater.

Maintenance

Regular maintenance is crucial to the longevity and efficiency of a tankless water heater. This includes flushing the unit, cleaning the air intake filter, and identifying issues early on to prevent costly repairs. It is recommended that homeowners create a dedicated maintenance fund to help cover these costs. One way to do this is to set aside 1% of the tankless water heater’s initial cost annually.

Some repair costs are not as obvious as others, but all should be factored into your budget. These costs may include routine maintenance and emergency repairs, as well as parts and labor. In addition, it is important to consider factors that can increase or decrease repair costs. For example, the location of your tankless water heater can impact maintenance costs, as it may be more difficult or expensive to access the unit.

The most common repair is to replace the water heater’s circuit board, which can cost between $45 and $200 per hour. Another common repair is to replace the anode rods, which can cost $25 to $50. It is also a good idea to install a pressure relief valve, which can reduce the risk of leaks and minimize energy consumption.

Another major maintenance task for a tankless water heater is flushing, which can help to reduce the amount of hard-water scale and other mineral deposits that build up on the unit. This can lead to improved efficiency and higher hot water capacity. It is also a good idea to follow the manufacturer’s recommendations for the flushing schedule. If you have trouble understanding the recommended schedule, it is advisable to seek professional guidance.

Finally, it is important to note that a tankless water heater requires an uninterrupted gas supply. If the gas line is damaged or not properly installed, it can cause a variety of problems. For example, the water heater will not operate properly, and the homeowner may experience lukewarm or cold water. In some cases, the gas line will need to be replaced entirely.

In the event that your tankless water heater needs repairs, it is best to contact a professional plumber. This will ensure that the job is done correctly and safely. You should also ask for a quote from multiple plumbers to get the best price.

Roofing

What Is Roofing?

Roofing Phoenixville PA is the construction and installation of the upper portion of a building or structure to provide protection against rain, snow, sunlight, extremes of temperature, and other elements.

There are many choices of roof materials nowadays, whereas only a few were available a few decades ago. For example, metal can be galvanized or galvalume, and shingles or shakes are made of wood.

The roof is the most important part of a building and it protects against rain, snow, sunlight, wind and extremes of temperature. It is also an opportunity to add value and character to your home’s appearance. Choosing the right roofing material is essential to its longevity and performance. There are a variety of choices, from shingles and clay tiles to wood shakes and steel panels. There are even new engineered materials that offer the look of natural wood or slate with improved durability.

A variety of roofing materials can be found on the market today, but some are better than others for certain weather conditions. For example, some roofing materials don’t work well in damp climates and may require extra maintenance to keep them dry. Others are flammable and may need to be treated with fire retardants or chemical preservatives.

Choosing the best material for your roof will depend on local weather conditions, the architectural style of your home, and your budget. The most popular choice for modern homes is metal roofing, which comes in a variety of colors and styles to complement any exterior design. Some types of metal can last for decades and are available in a wide range of thicknesses to fit any home’s aesthetic and budget.

Another popular option is shingle-style roofs, which come in a variety of styles and colors to suit any exterior. Some are crafted from natural wood, such as cedar or redwood, while others are manufactured with recycled materials. These shingles are more lightweight and less expensive than many other roofing options, but they do not provide as much insulation or protection against the elements.

Regardless of the type of roofing material chosen, sheathing is an integral part of the roof structure and provides the foundation for the rest of the roofing system. Sheathing is usually a layer of plywood or a similar material, which must be water-resistant and strong enough to support the weight of the roofing material. In some cases, concrete sheathing is used, which is particularly effective for high-rise buildings and other structures with very steep slopes.

Installation

Roofing involves the construction and installation of the protective covering or structure that forms the topmost part of a building or other structure. It protects against rain, snow, sunlight, extremes of temperature, and other elements. Roofs can be built in a variety of ways, including flat or sloping surfaces and domed or vaulted structures.

Besides the obvious benefit of providing protection from weather elements, a well-installed roof adds to the value of your home. It also improves energy efficiency and may help with soundproofing. It’s important to select a reputable contractor when having your roof replaced or installing a new roof. Look for a company with local references, an active license and certifications, and excellent Better Business Bureau ratings. Also, check with your homeowners insurance agent to see if there are any restrictions on the type of roofing materials allowed in your area.

Your roofing professional will begin by removing any existing roofing materials and cleaning up the work area. Then, they will install the underlayment. This material is a waterproof barrier that’s installed over the sheathing and under the shingles. It’s made from heavy plastic or rubber and covers the entire deck of the roof. It closes around nails and provides a watertight seal.

The roofing contractor will then lay the shingle over the underlayment, nailing it in a pattern that alternates with rows of close and spread out nails. The shingle row in the center is usually spaced farther apart than the others. A ridge cap shingle is then installed at the top of the roof to provide a finished appearance and to prevent wind uplift.

Your roof may have penetrations for sewer vents, ductwork, chimneys, skylights, and plumbing vents. These are called flashing and are installed in the joints where different planes of the roof meet. Your roofing professional will install flashing that is compatible with the type of roofing you have on your house.

Maintenance

A roof is an important part of any structure, protecting the interior from rain, snow, sunlight, wind, and extremes of temperature. It is constructed in a variety of forms, including flat, pitched, vaulted, domed, and curved, as dictated by technical, economic, and aesthetic considerations. A variety of roofing materials are available, including asphalt shingles, tile, metal, and wood. Roofs are inspected and maintained on a routine basis to detect problems early and prevent serious damage.

The most common maintenance activities are to inspect the condition of shingles and other roof surfaces on a regular basis, remove debris from drains, re-flash openings in penetration base flashings, re-seal leaking gutters and downspouts, repair cracks in masonry or asphalt shingle siding, and replace loose or deteriorating caulking around vent pipes, chimneys, and other accessories. Depending on weather conditions, some areas of the roof may require more frequent attention than others. During the inspection process, it is often helpful to look for signs of water leaks inside buildings, as well as to note any moss or lichen that is growing on the shingles.

Another maintenance activity is to clean the roof surface of algae, mold, mildew, lichen, and moss. Depending on the type of roof, this can be accomplished by washing it with soap and water or using a chemical treatment. Keeping the roof free of these contaminants can prolong the life of the roofing system and improve its appearance.

During the inspection process, it is also helpful to check for any damage to roof trusses or beams caused by weather and other events. It is also a good time to trim trees that hang over or touch the roof, especially if they are growing rapidly. During this inspection, it is also important to make sure that safety procedures are followed, particularly when there is electrical equipment, harmful chemicals, or hot pipes on the roof.

The roof has flashing around the chimney and vent pipes to help prevent water from leaking into the house. This can be re-caulked on an annual basis to prevent the leaks.

Repairs

Roof repairs are a great way to address issues that arise from time to time. They can fix leaks, repair damaged shingles or other materials, and can help prolong the lifespan of your roof. Repairs can also be more cost-effective than a replacement project, making them an appealing option for budget constraints or homeowners looking to save money.

When dealing with damage to your roofing, it’s important to act quickly. Waiting until you start to see visible signs of leaking or your roof is buckling can lead to further problems and costly repairs.

The decision to repair or replace your roof will largely depend on how extensive the damage is, how old your roof is, and what kind of budget you have available for this home improvement project. Both options have their pros and cons, so it’s important to understand the differences between them before making a final decision.

Replacing your roof involves removing the existing shingles and installing new ones. This method is the most comprehensive way to deal with roof damage, and it can offer a better level of protection against leaks. However, re-roofing can be more expensive than replacement due to the fact that it requires more labor and material. Additionally, re-roofing can cause the new shingles to have a patchwork appearance and may not match well with the old shingles.

Repairing your roof consists of fixing components like pipe boots, flashing, ventilation, and more that are causing leaking or other minor issues. It can also include patching holes and small gaps, replacing shingles and other materials, and repairing or reinstalling gutters. Repairing your roof is a great way to extend the lifespan of your roof, but it can’t address any underlying issues that might be discovered.

A roof can be a significant investment for any homeowner. Choosing the right solution for your roof can save you money and hassle in the long run, so it’s important to weigh your options carefully before committing to any type of home improvement project.